

“Unless someone like you cares a whole awful lot, nothing is going to get better. It’s not.” – Dr. Seuss, The Lorax
We owned a small corner lot within the city limits. When we renovated the house 15 years ago, we tried to have the builders preserve an existing maple tree in the lot. In retrospect we should have done a better job as when they moved some boulders in the yard, one of them scraped against the bark on the one side. In time, we noticed the damage but it seemed that the tree would survive. That was until this past spring. It seemed that the tree came out of winter hibernation and started to put out new leaves. Shortly thereafter, the branches were progressively choked off leaving the leaves to wither and die. Concerned about the health of the tree, we called a local arborist for advice. He suggested that we take the tree down because the prognosis was not good.
The fate of most urban trees in the United States is the landfill or as firewood. If we were to capture only 20% of the 12.7 million metric tonnes of potential high-quality lumber taken down in urban areas each year, the carbon offset would be equivalent to planting 154 million trees and letting them grow for 10 years ( https://urbanwoodnetwork.org ). Concerns about carbon footprints and sustainability naturally feed into interest in redirecting these trees to more productive uses, like sawing logs into lumber. Urban trees present challenges in milling due to the potential presence of hidden metal or other objects incompatible with a saw blade. Just walking around the neighborhood, I saw nails and eye bolts that were in the process of being incorporated into the local urban trees. Because of this embedded metal, commercial mills are not interested in urban logs but portable mills enable milling lumber at a smaller scale. The smaller scale sawmill can take the time to find and avoid hidden metal. Of course, not every tree can yield high quality lumber nor is every part of the tree useful. I’ve learned that pin oak is best used as firewood due to it’s tendency to self-destruct. Given my preference for hand tools, I prefer well behaved grain, which is most likely found in the main trunk of the tree (or bole, which is between the base of the tree and the first branches).
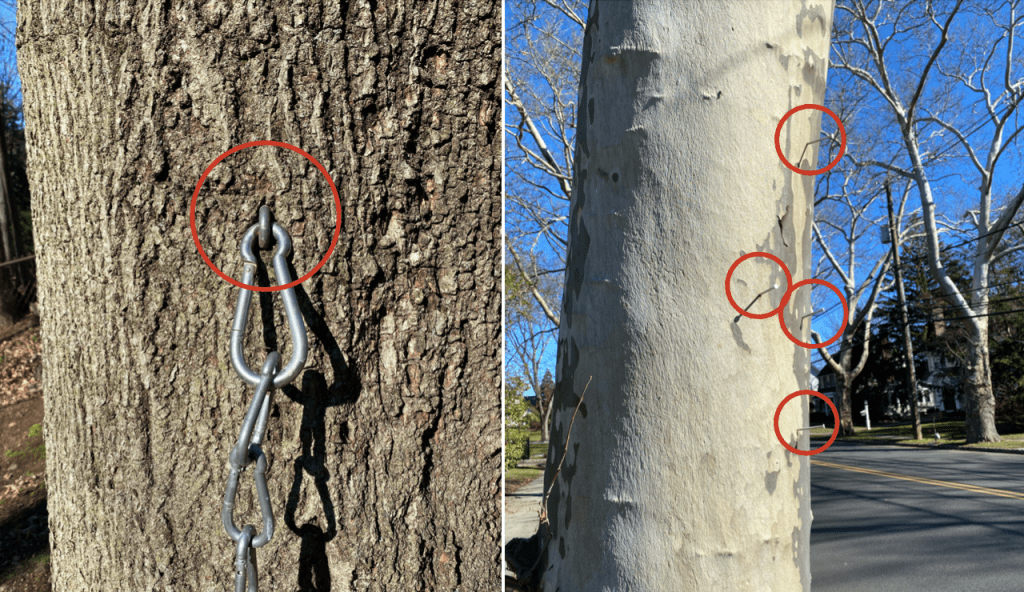
Some examples of metal found in urban trees from a walk around the block.
In the interest to preserve some aspect of the tree instead of mulching the entire tree, I asked that the arborist leave the main trunk of the tree, which resulted in a 8 foot long log. I then proceeded to mill the log into slabs. What follows are some of my take-home points from milling the log.


1. Straight banana
Unlike manufactured building materials like MDF, how one saws a log into boards can have a big influence on how the sawn board behaves during drying and end use. Two aspects that I noticed with this log. The first aspect that I noticed was that the grain ran mostly straight along the long axis of the log. Alternatively trees can grow in a way that the grain spirals around the long axis of the log. Spiral grain is not preferred as the boards sawn from such a log. While straight and flat when sawn from a wet log, tend to twist as they dry. You then have to mill the log into extra thick boards quite a bit thicker than what you want in the end. As you mill boards to final dimensions, you have to take some intermediate steps as the boards tend to twist a bit more during the milling process. The boards themselves can have short grain, which limits the strength of the wood and can influence where you use particular boards within a piece of furniture. Luckily this tree had straight grain, so I was happy with that.

Lumber tends to be cut along the main axis of the tree. Spiral grain direction in the tree results in lumber with changing grain direction along the surface of a board and high potential to twist as it dries.
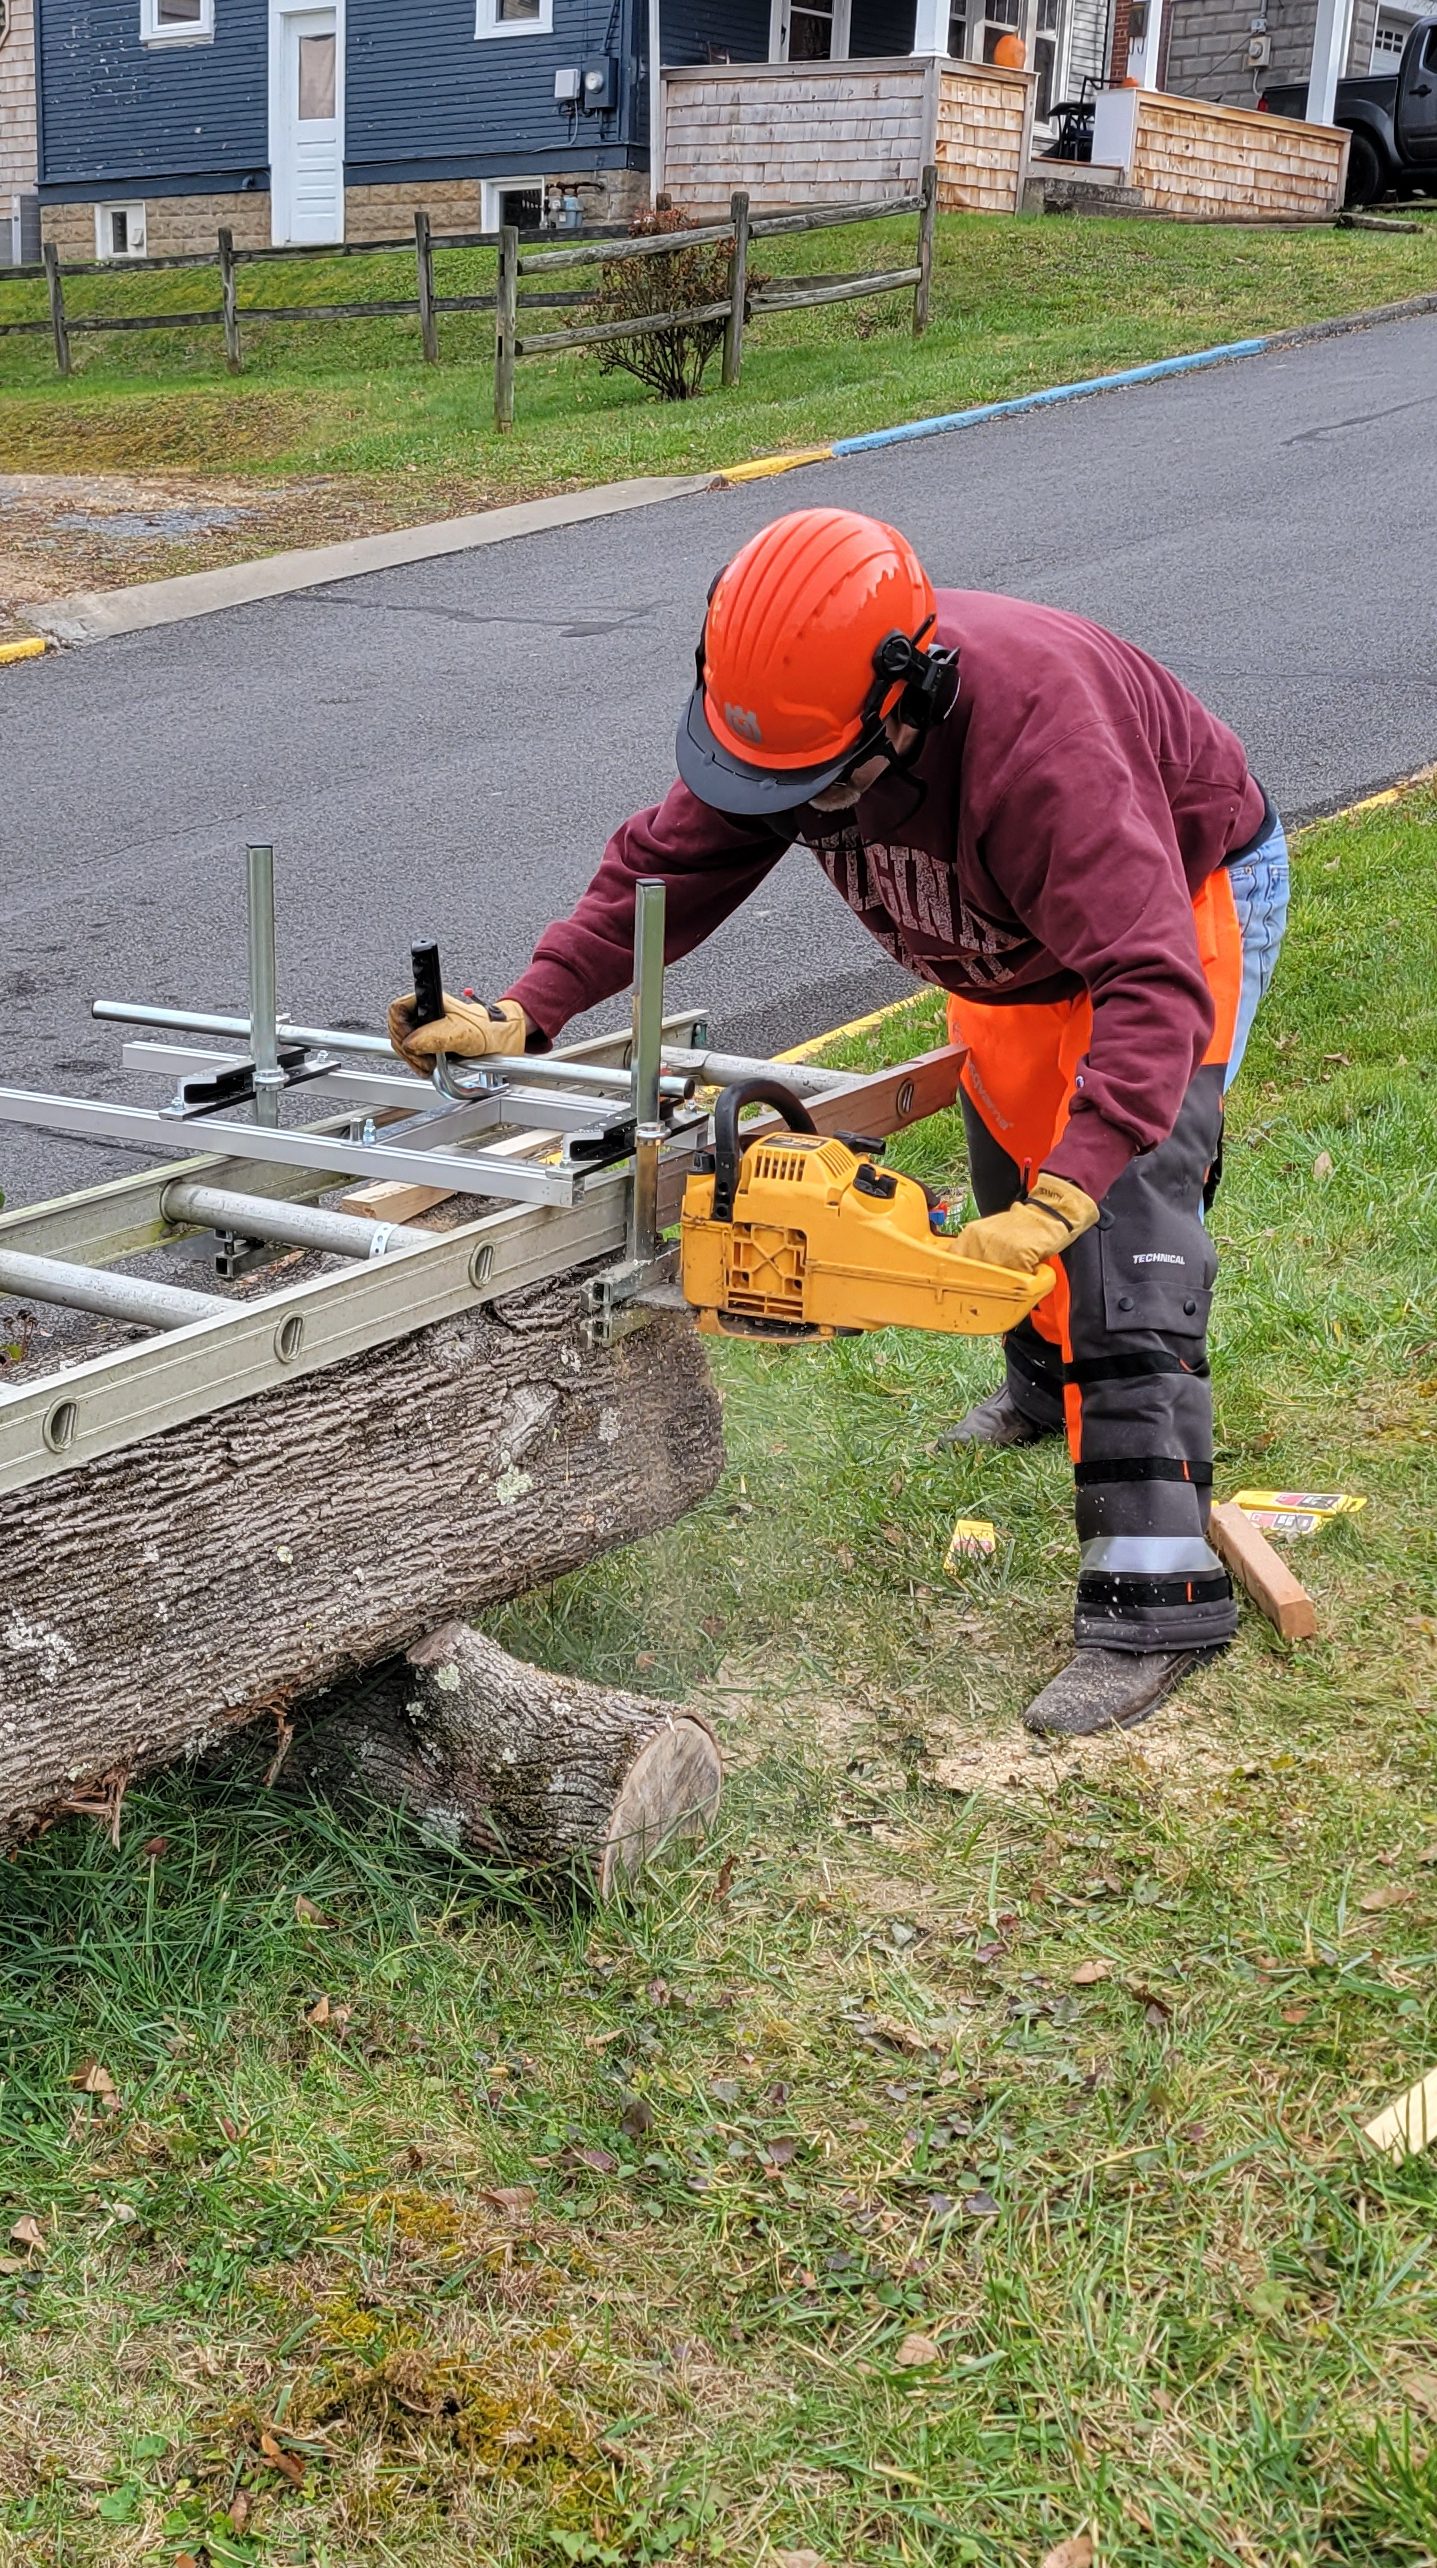
As our yard is not flat, the log had a slight curve to it, kind of like a banana. The second aspect was to orient the log during milling so that the curve was to the side. This would yield the boards with the straightest grain possible from the log. Once oriented, I then attached a 12’ aluminum ladder to the top of the log with drywall screws. As logs tend to have a truncated cone shape and the top of the tree is narrower than the base of the tree, I placed shims of different thicknesses under each end so that the ladder formed a plane that was parallel to the central axis of the log. Successive passes yielded slabs of about a 2.5” thickness. As cracks during drying tend to originate at the center of the tree (or pith), I also made sure that one of the cuts went through the pith.
2. Alaskan mill
Sawing the log into slabs, I used an Alaskan mill purchased from Granberg. I purchased a 30 inch Alaskan mill which allows a cutting width between 24 and 26 inches. An Alaskan mill is a contraption attached to a chainsaw designed to be easily transported and used in the bush to convert logs into usable lumber. This contraption allows you to cut the log at a consistent distance away from a reference surface, like the ladder attached to the top of the log, to yield a slab. Attaching a ladder on top of the log guides the first cut. The flat surface created by the first cut can be used to guide the next cut. The challenge with using this freshly sawn surface of the log as a reference is that the Alaskan mill is not fully supported when you enter and exit the log. This creates challenges for milling a flat surface but more importantly safety concerns with handling the saw unsupported. I decided to attach the ladder to the log for cutting each successive slab. This creates a nice stable surface for initiating and finishing the cut. As the saw progressed through the log, you also need to insert wedges into the saw kerf so that the weight of the cut slab doesn’t force the saw kerf to close and pinch the blade. Having them handy and painted a color that you can see them find them in the pile of saw chips is also helpful. The Granberg Alaskan mill was easily assembled and adjusted. All of the nuts and bolts were of the same size as the chainsaw bolts, which simplified adjusting as it can be done with the chainsaw wrench.
3. Rip chain helps
The cutting edge on a saw blade is configured one of two ways. As the fibers in wood align vertically in a growing tree, cutting the wood perpendicularly to the axis of the tree – called a cross-cut – uses a different configuration of the cutting edge than cutting the wood along the axis – called a rip-cut. The cutting edge in a cross-cut saw is angled around 15 degrees away from the surface being cut – think angling your hand to karate chop the wood. In contrast, the cutting edge in a rip-cut saw is parallel to the surface being cut – think angling your hand flat to scoop out the wood. A rip-cut is used when sawing a log into boards; yet, most chainsaws come with chains configured for cross-cuts. Thus, using a chain filed for a rip-cut is more efficient when milling logs into lumber. Before milling the log, I put on a rip-chain and touched up the cutting edge with a chainsaw file after two slabbing passes. In touching up the cutting edge, I oriented the file at 90 degrees to the chainsaw bar and made two passes on each tooth. Wearing gloves for this step is important as you don’t want to slice your hands on the freshly sharpened chain.
4. More power
In the realm of chainsaw use, cutting a log into slabs tends to be a difficult task for a chainsaw, as the motor spends a relatively long time at full throttle and the entire bar is engaged in cutting. The Granberg website has recommended chainsaw sizes for the anticipated depth of cut. In purchasing a 30 inch Granberg chainsaw mill, the recommended minimum power required is 60cc. I initially tried to use a 40cc Poulan chainsaw that I already had. It was wholly underpowered as once I got the saw up to speed at full throttle, the saw would stall if I continued to progress in the cut. I then changed to a 68cc Proyama chainsaw that I had purchased for this task. While Proyama is supposed to be a Husqvarna clone, the 30” Oregon replacement bar for Husqvarna didn’t quite fit right on the motor head. I think the mismatched fit restricted the flow of oil to the chain when running. Overall though, the 68cc chainsaw worked much better than the 42cc saw, as indicated in Granberg’s table. As the Proyama chainsaw didn’t make the move from WV to NJ, I’d get a bigger chainsaw next time.
5. Ladder helps with every cut
An Alaskan mill relies on a reference surface to make a parallel cut creating the slab. A common reference surface is a single side of an aluminum extension ladder. Ideally the ladder should be a couple of feet longer than the log so that the ladder overhangs a bit the beginning and end of the log. Here, I had a 12 foot long aluminum ladder at my disposal and the log was about 8’ long. This ladder was then attached to the top of the log using wooden shims, small lengths of metal strapping, and drywall screws. I set the height of the ladder such that the two ends of the ladder are equidistant from the center of the log and parallel to the ground. Some of the advice online suggests that you only need to use the ladder for the first cut. Subsequent cuts can reference off of the top of the slab. I didn’t like that idea for three reasons. The first one is related to safety in that the chainsaw isn’t fully supported as the saw blade enters and exits the log. Such a big chainsaw and bolted-on Alaskan mill can be a bit unwieldy when it is unsupported. So I liked using the aluminum ladder for each cut. The other reason is that if you don’t use the ladder after the first cut, you have to reset the depth of cut on the Alaskan mill between the first and all subsequent cuts. I liked the consistency between slab cuts. Finally, the Alaskan mill seemed to slide more easily over the aluminum ladder than it would over the sawed surface of the sawlog.
6. More lube!
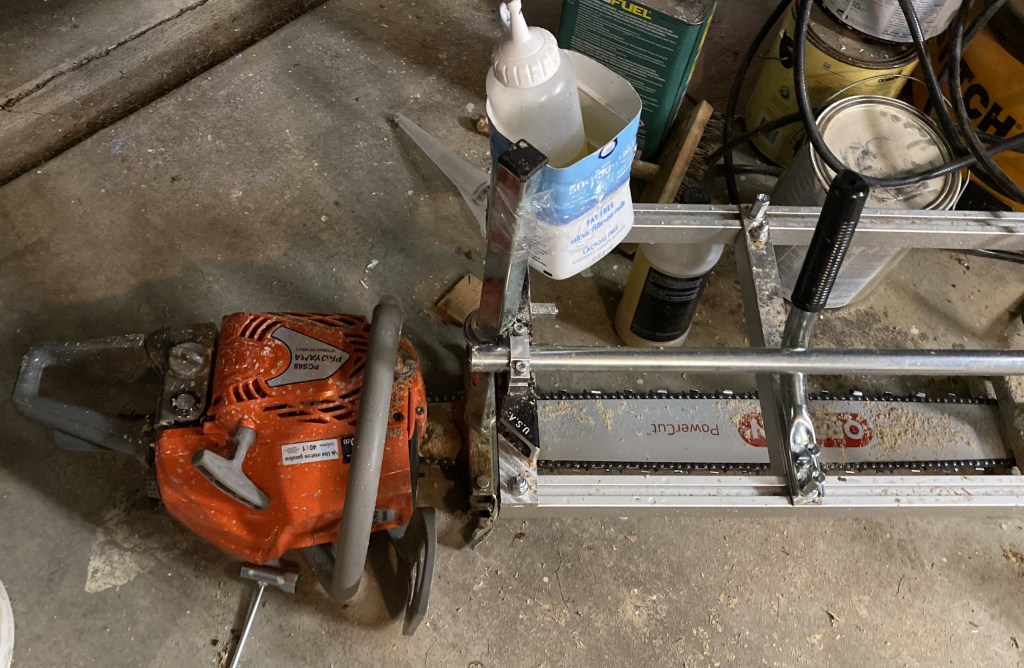
The power provided by the motor aims to overcome the force required to cut the wood and remove wood chips from the saw kerf. The motor must also overcome the frictional resistance of moving the saw chain through the kerf and along the metal bar. While some oil is applied to the bar as the chain exits the motor, the oil can be quickly dissipated by sliding along the wood. With a 30 inch bar, the chain has to travel quite a distance before getting more oil. At the extreme, heat introduced by the motor and frictional resistance can shorten the lifespan of the cutting edge. External oilers can be added to the far end of the bar to lower this frictional resistance. As the Proyama’s head didn’t quite fit the Oregon chainsaw bar and limited oiling of the bar, the bar became so hot that the inside of the motor head cover melted and disabled the chain brake. As I didn’t get an external oiler, I decided to improvise. First, canola oil is a cheap alternative to official chainsaw bar oil and is used when logging in environmentally sensitive area. Next, I purchased a condiment squeeze bottle from Target and taped the bottom half of a plastic milk jug to the vertical handle of the Alaskan mill to put the squeeze bottle. I then filled up the squeeze bottle with Canola oil purchased from the grocery store and frequently squirted oil onto the bar and chain as it exited the motor head. Overall, adding more lube seemed to really improve heat dissipation and it just seemed to work better. Bushcraft engineering for the win!
7. Summary
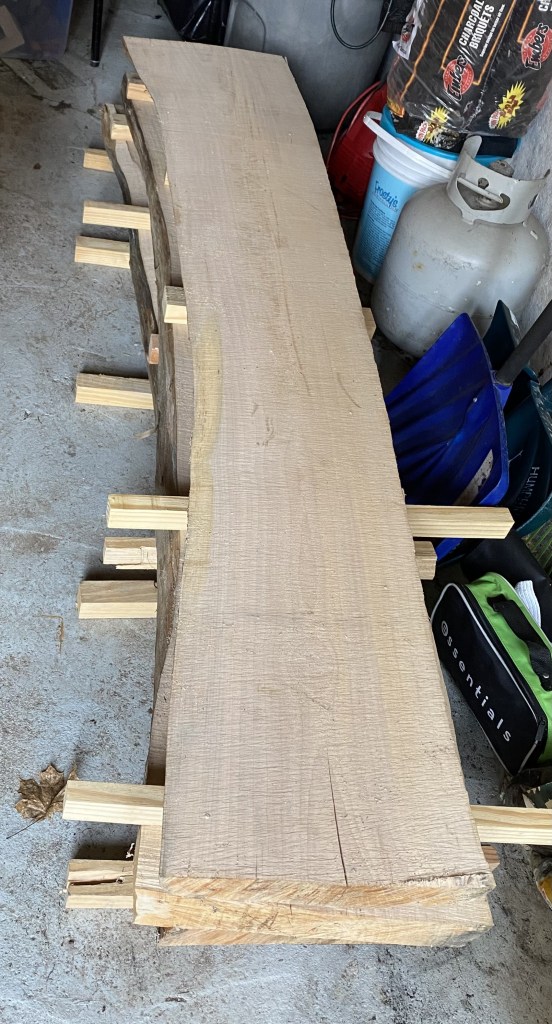
This was a weekend project with the first day focused on assembling the Granberg mill attaching it to the chainsaw, figuring out how to attach the ladder to the log, experimenting with the 40cc Poulan chainsaw, and then switching to the Proyama chainsaw. Overall, a lot of time of the first day focused on troubleshooting the approach and managed only two cut passes. Progress on the second day was much faster once I figured everything out and made three cut passes to finish the log. Overall, I ended up with four 2.5 inch thick slabs with fairly straight grain. The top and bottom slices of the log were discarded as waste. After painting the ends with shellac to limit end checking, the slabs were stickered and put in the garage to air dry. While I didn’t see any signs of insect infestation while sawing the log, I also sprayed the slabs with a Bora-Care solution to limit wood-boring insect infestation. Next is to figure out what to make with them.
